# Integrate Pubnub with your Unreal Project
## Introduction
To connect Pubnub to your in-game experience, you can make use of Pubnub's Publish, Subscribe, and History functionality to send, receive and list all messages sent to specific channels.
This can be done in both:
1. Your Unreal Project by making use of Pubnub's APIs.
2. Your web application using [Pubnub's documented SDKs](https://www.pubnub.com/docs/sdks)
This guide covers setting up Pubnub to work within your Unreal project.
For information on setting up Pubnub in a web project, we recommend checking out Pubnub's own documentation on their [chat SDKs](https://www.pubnub.com/docs/chat/overview) and [core SDKs](https://www.pubnub.com/docs/sdks), as well as how to [publish](https://www.pubnub.com/docs/general/messages/publish) and [subscribe](https://www.pubnub.com/docs/general/channels/subscribe) to messages via their APIs.
## Setting up Pubnub in your Editor
### Retrieving your Keys
When creating your Pubnub application and keyset, you will find that each keyset has a Publish, Subscribe, and Secret Key associated with it. For the purposes of implementing Pubnub chat in your project, you will need to note down your **Publish** and **Subscribe** key, as these will be used as part of the API requests.
In addition to needing these keys, every request made must be associated with a **Pubnub Channel**. There is no special set-up required to create a new channel - they are created automatically when providing a value for channel name in any of the API calls.
### Pubnub APIs
We will be making use of 3 key APIs as part of integrating pubnub with the in-game chat component:
1. Publish API (POST):
1. **`https://ps.pndsn.com/publish/{`****`my-pub-key`****`}/{`****`my-sub-key`****`}/0/{`****`my-channel-name`****`}`**`/0?uuid={my-unique-id}&auth={my-auth-token}`
2. Subscribe API (GET):
1. **`https://ps.pndsn.com/v2/subscribe/{`****`my-sub-key`****`}/{`****`my-channel-name`****`}`**`/0?uuid={my-unique-id}&tt={my-time-token}&tr={my-region}&auth={my-auth-token}`
3. History API (GET):
1. **`https://ps.pndsn.com/v3/history/sub-key/{`****`my-sub-key`****`}/channel/{`****`my-channel-name`****`}`**`?include_message_type=true&include_uuid=true&include_meta=true&max=100&uuid={my-unique-id}&auth={my-auth-token}`
### Important Blueprints
There are 2 blueprints that will aid you in implementing Pubnub supported chat:
1. **`BP_M2_PubnubConnection`** : this is a helper blueprint that handles the construction of the pubnub API urls, and handles the sending of all requests. We recommend looking through this blueprint, as well as the TextChatcomponent, to get an understanding of how both blueprints work together to retrieve data from Pubnub and display it in the text chat widget.
2. **`BPMC_Pubnub_TextChatComponent`** : this is an example text chat component hooked up to pubnub (using `BP_M2_PubnubConnection`), which handles sending messages and listening to messages. It is just missing authentication, which will need to be provided to make this work.
{% hint style="info" %}
NOTE: Prior to release v38, `BPMC_Pubnub_TextChatComponent`. The steps below are largely similar, but you will instead need to use the deprecated `BPMC_TextChatComponent`
{% endhint %}
### Modifying the BP\_Pubnub\_TextChatComponent Blueprint
In the example content, the chat widget (`WBP_M2Example_TextChat`)is controlled by the blueprint `BPMC_M2Example_TextChatComponent`. You will need to:
1. Make a copy of `BPMC_Pubnub_TextChatComponent` and `WBP_M2Example_TextChat`.
2. In your copy of `BPMC_Pubnub_TextChatComponent`, fill in the following fields:
1. `SubscribeKey`
2. `PublishKey`
3. `ChannelName`
4. `AuthToken` (optional)\
\
The channel name as mentioned above can be defined as anything you like. When initializing the Channel Name variable, ensure you give it a default value so that in cases where world/launch context id does not exist, your chat will still be sent to your default channel.\
\
You can use **any unique identifier for channel name;** for example, you can use our helper node `Get M2 Web Platform World ID` to retrieve the world's unique id. This will ensure that each launched world will use a separate Pubnub chat channel, so messages are properly gated.
3. In your copy of `WBP_M2Example_TextChat`, update the logic in `OnBootflowFinished` to get and listen to the events on your custom text chat component instead of `BPMC_M2Example_TextChatComponent`
4. Add your custom text chat component to your BPM (e.g. `BPM_Example_PlayerCharacter`)
5. Replace the `WBP_M2Example_TextChat` with your updated widget in your HUD (e.g. `WBP_Example_HUD`)
{% hint style="info" %}
The above method requires exposing publish and subscribe keys in editor. Whilst this won't be exposed to players, you may want to obfuscate these with a more robust handling of your pubnub keys.
A recommended approach would be to integrate the returning of keys with an existing/new web service. Pub, sub, and auth tokens can then be returns via an API call from this service, and used directly instead of the blueprint variables above. This could all be handled via an intermediary blueprint (similar to the M2 Social World Service).
{% endhint %}
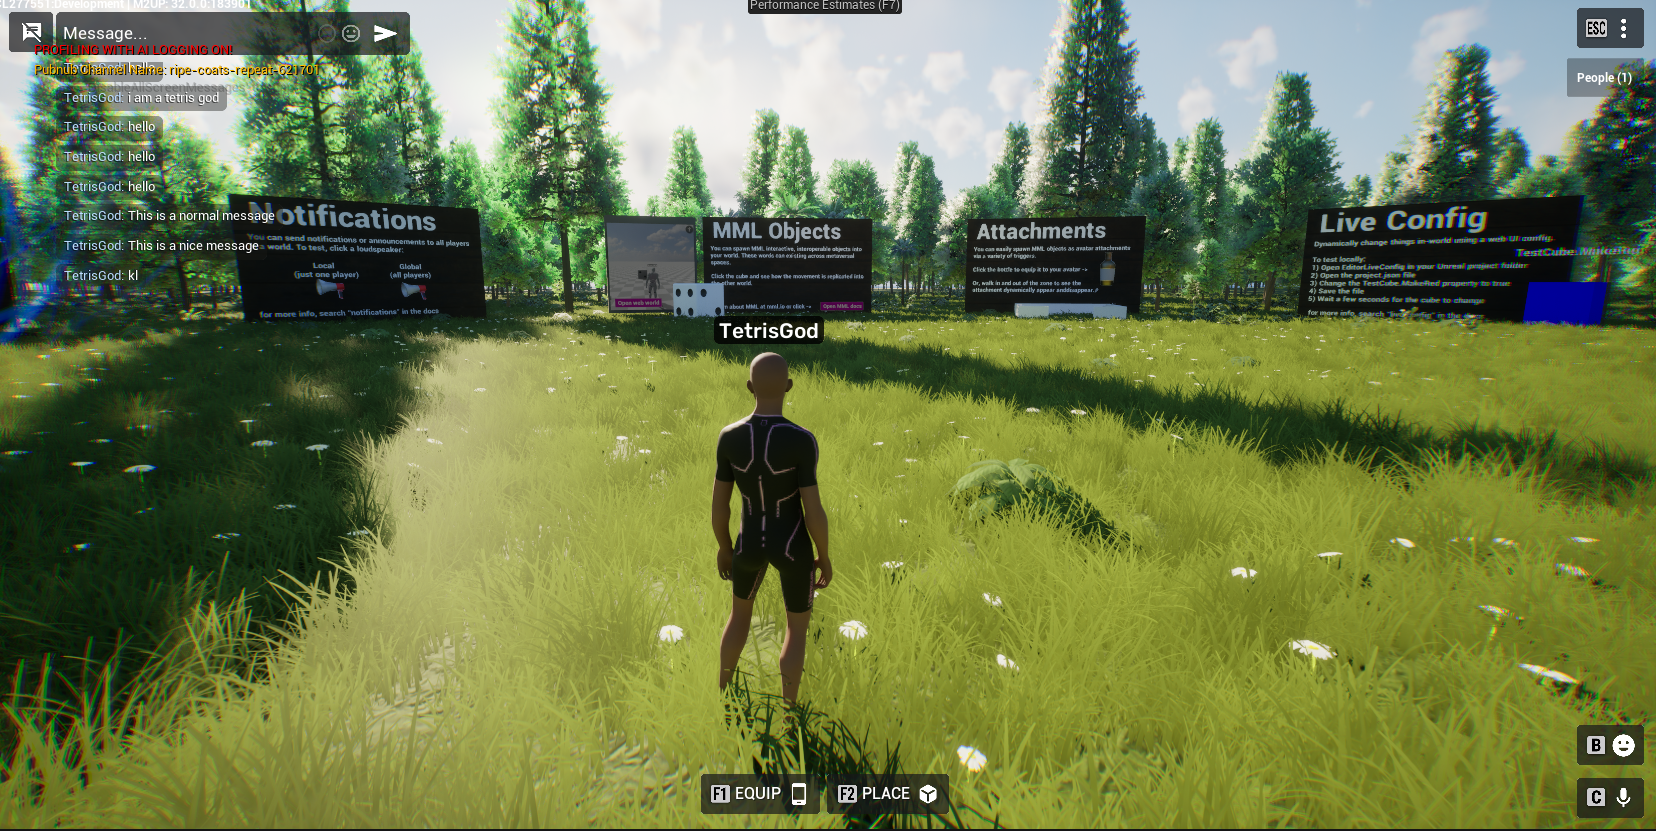
If everything is set up correctly, you should be able to send messages using the chat widget in PIE as before, and the history of the chat should be shown in the in-game chat!

 4. Add your custom text chat component to your BPM (e.g. `BPM_Example_PlayerCharacter`)
5. Replace the `WBP_M2Example_TextChat` with your updated widget in your HUD (e.g. `WBP_Example_HUD`)
{% hint style="info" %}
The above method requires exposing publish and subscribe keys in editor. Whilst this won't be exposed to players, you may want to obfuscate these with a more robust handling of your pubnub keys.
A recommended approach would be to integrate the returning of keys with an existing/new web service. Pub, sub, and auth tokens can then be returns via an API call from this service, and used directly instead of the blueprint variables above. This could all be handled via an intermediary blueprint (similar to the M2 Social World Service).
{% endhint %}
If everything is set up correctly, you should be able to send messages using the chat widget in PIE as before, and the history of the chat should be shown in the in-game chat!
4. Add your custom text chat component to your BPM (e.g. `BPM_Example_PlayerCharacter`)
5. Replace the `WBP_M2Example_TextChat` with your updated widget in your HUD (e.g. `WBP_Example_HUD`)
{% hint style="info" %}
The above method requires exposing publish and subscribe keys in editor. Whilst this won't be exposed to players, you may want to obfuscate these with a more robust handling of your pubnub keys.
A recommended approach would be to integrate the returning of keys with an existing/new web service. Pub, sub, and auth tokens can then be returns via an API call from this service, and used directly instead of the blueprint variables above. This could all be handled via an intermediary blueprint (similar to the M2 Social World Service).
{% endhint %}
If everything is set up correctly, you should be able to send messages using the chat widget in PIE as before, and the history of the chat should be shown in the in-game chat!